


 – Fit Foodie Finds")


")


 TV Shows")


Soldering is the process of joining two metals by melting a filler material. The filler material holds the two metals together. Using soldering, you can connect disjoint electrical wires, join plumbing pipes, fill holes in metal sheets, and more.
But, you can not apply the same technique to solder small electronic components such as resistors, capacitors, and ultra-fine wires. Some components used in a PCB board are smaller than the size of a grain.
That is where micro soldering comes into play. Micro soldering is the same as soldering, but the whole process is done on a smaller scale. That is, smaller tools are used to solder microelectronic components.
Using micro soldering, you can connect small wires that are 9 microns in size. This size is almost 10 times thinner than human hair.
The following article explains the types of tools and equipment used in micro soldering and the step-by-step process of how it is done.
What is Micro Soldering?
Micro soldering is the process of joining ultra-fine wires and microelectronic components using miniaturized equipment. Similar to soldering, micro soldering also melts a filler material that joins two workpieces together.
The advent of technology has led to a decrease in the size of electronic components. With further technological advancements, their size will get reduced further.
So, micro soldering is expected to play a crucial role in troubleshooting electronic devices and components in the future.
Micro Soldering Tools and Equipment
As mentioned already, micro soldering requires more precision than conventional soldering. To achieve that level of precision, you should equip yourself with the right tools and equipment.
Below are the most commonly used micro soldering tools and equipment,
Micro Soldering Microscope
For any repair job, you have to first examine the workpiece physically. Only then, you will be able to know the extent of the problem. A good micro soldering microscope should have 0.5x to 10x.
Besides, it should have an extended work distance and the ability to attach a camera. The camera will help you to take pictures and record videos for further examination.
Micro Soldering Rework Station
A rework station generally includes at least a soldering iron and hot air gun. If your rework station does not have a soldering pencil or a micro-tweezer, then you will have to buy them separately.
Also, we recommend you get separate stations for using a soldering iron and a hot air gun. Stations in which you can use both don’t tend to work well.
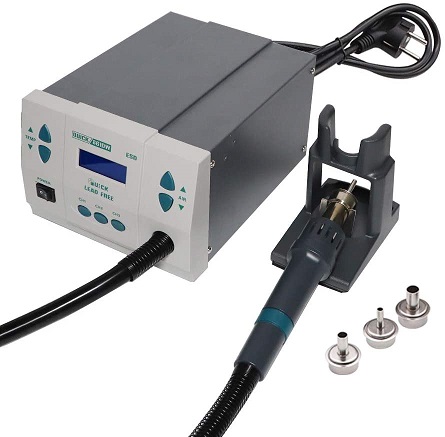
Micro Soldering Hot Air Station
A hot air station uses heated air to heat the PCB board that you will work on. It uses nozzles of different sizes to direct air and distribute the heat evenly throughout the board.
Micro Soldering Iron
A micro soldering iron is what supplies heat to melt the solder. Once the solder melts, it will form a joint and connect two workpieces. Its shape resembles that of a screwdriver and it runs on electricity.
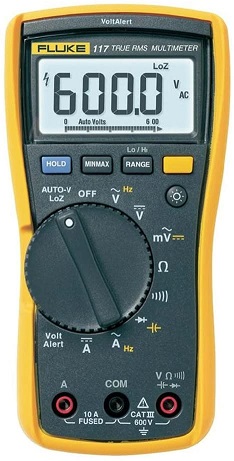
Micro Soldering Multimeter
If you are repairing a logic board, then you definitely need a micro-soldering multimeter. You can get a simple multimeter without any fancy setting. You will use the multimeter only to test continuity, voltage, resistance, and capacitance.
Micro Soldering Software
There are different micro-soldering software available in the market but the most popular one is ZXW Tools.

The latest version of the software is ZXW 3.0. It allows you to see which component is next without having to look at the drawings. While it is free to download and install the software, you have to pay an annual subscription to use it.
Tips on How to Micro Solder
While micro-soldering any electronic components, there are certain steps you will have to follow.
Assume that you are going to fix a broken power connector. These are the steps you have to follow,
Step 1: Remove defective part
The first step is to remove the part that is not working. In our case, it is the power connector. You can examine the part using a micro-soldering microscope. After that, you can remove the part using either a soldering iron or a hot air gun.
Step 2: Preparation for repair
Now, resolder the new socket in place and connect the lead to the data port. After that, remove the coating on the board at the soldering area using a knife.
Step 3: Preparing to solder
Take a 60mm wire and strip it. Then, put the wire in the path where you need to attach it. You can also bend the wire to give it more leverage.
Step 4: Secure wire for soldering
Use electrical tape over the bent wire and secure it. Ensure that the wire does not move and is fixed in its place.
Step 5: Trim to fit
Using the tip of your soldering iron, dab the area with liquid flux and solder the wire to the lead. After this, remove the tape and clear the flux. Also, cut the wire to get the required length.
Step 6: Examine the board with a microscope
After you have completed the micro soldering, examine the board using a micro-soldering microscope to check if the soldering is intact.
There is it. You have replaced the defective electronic component with a new one using micro soldering.
Safety Precautions to Follow while Micro Soldering
There are safety precautions you need to follow while micro soldering. If not, the repercussions could be severe.
- Before starting to solder, protect your eye using a mask
- Wear gloves while holding the soldering iron
- Do not touch the tip of the soldering iron.
- Keep the soldering iron in its place after using it.
- Soak the cleaning sponge in water before you start soldering.
- Pull the plug from the socket when not using the soldering iron.
- Do not keep any electrical cables in the soldering station.
- Keep a first aid kit ready just in case.
Conclusion
Since micro soldering requires more precision and miniaturized equipment, it is difficult to get micro soldering services. Besides, they also cost more. With our step-by-step process, you can micro-solder electronic components by yourself.
But, you need to have some experience in soldering. Also, we highly recommend you follow our safety tips.
If you have any further queries or doubts, you can let us know using the comments section. We will help you out. You can also post your thoughts and opinions in the comments box.
Source link


