


")


Pan Seared Chicken Breast is an easy weeknight meal that takes less than 30 minutes to whip up and only a few ingredients.
Make this flavorful stovetop chicken breast recipe and pair it with your favorite veggie and grain to complete your meal!

Pan seared chicken breast is hands-down one of my favorite easy chicken recipes! It’s quick, simple, and oh-so flavorful.
Why Pan Seared Chicken Breast?
Yes, we know there are countless ways to make chicken breast – baked chicken, grilled chicken, Instant Pot Chicken, Sous Vide Chicken, so why pan seared chicken?
- Fast: In less than half an hour you can have a beautiful dinner whipped up that the whole family will adore.
- Easy Ingredients: All you really need for this recipe is chicken breast, spices, and butter/olive oil.
- Versatile: serve it on pasta, with veggies, in a casserole, or on top of rice. This method of cooking makes chicken so versatile!
- Flavorful: you are absolutely going to live the chicken seasoning we used on this pan fried chicken.
Cooking Accessories for Pan Seared Chicken Breast
Here are all of our favorite cooking accessories for making stovetop chicken breast a cinch!
How to Cook Chicken Breast on Stove
Stovetop chicken is soooo simple and only requires 3 steps and about 30 minutes of your time. Check it out:
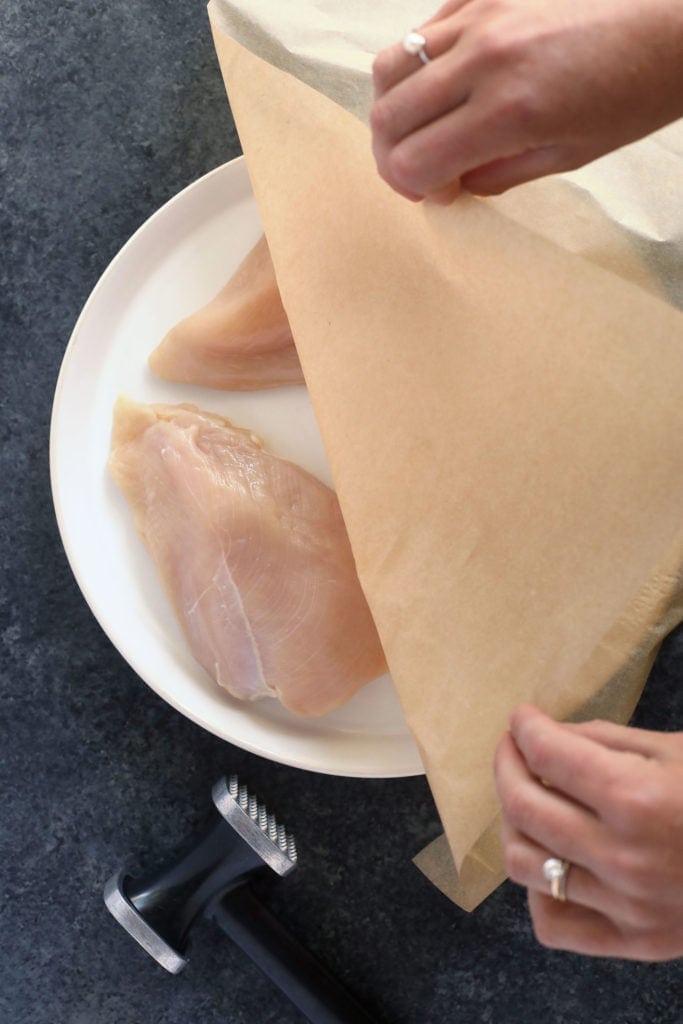
Step 1: Tenderize
Tenderizing your chicken breast may seem like you’re going above and beyond, but it’s actually super important!
Why should I tenderize chicken breast?
The reason you should tenderize your chicken before pan frying is so that everything cooks evenly. Chicken breasts can vary in size; part of your chicken could be 2.5 inches thick and other parts could be 1 inch thick.
Place chicken breast on a cutting board and cover them with parchment paper. Then, use a meat tenderizer to pound chicken breast until it is even throughout.
quick tip!
The more you pound it, the faster it will cook. We pounded our chicken breast until it was about 1 to 1.5-inches thick.
Step 2: Season
When in doubt, do NOT skip this step! Seasoning your chicken breast is important for flavor, post-searing!
Best Chicken Seasoning
We’ve whipped up a homemade chicken seasoning for this recipe that’s savory, garlicky, and slightly smokey. We have an entire post about this chicken seasoning, but I thought I’d give you the low down on what’s in it!
- Garlic powder
- Chili powder
- Cumin
- Dried thyme
- Ground mustard
- Dried basil
- Ground pepper
- Red pepper flakes
- Sea salt
- Paprika
- Brown sugar
For 1.5 lbs. of boneless skinless chicken breast, you’ll need about 1.5 tablespoons of chicken seasoning.
chicken seasoning pro tip
One thing that I absolutely love doing is making a triple or quadruple batch of this chicken seasoning. I like to keep it on hand to use on all cuts of poultry and even pork or beef!

Step 3: Sear
Now that your chicken breast is all seasoned and ready to go, it’s time to sear those babies on the stovetop!
- Heat 1/2 – 1 tablespoon of butter in a sauce pan over medium/high heat. Once the butter is fragrant, sear chicken breast for 2-3 minutes or until browned. Depending on how big your pan is and how big your chicken breast is, you can either do 1 chicken breast at a time or multiple.
- Flip the chicken breast over, add a little more butter, turn the heat down to medium, and cover. Cook for about 6 minutes or until the internal temperature of the chicken reaches 165ºF.
- Once you’ve reached 165ºF, immediately remove the chicken from the pan and let rest for 5-10 minutes.
Can I use olive oil instead?
Feel free to use olive in oil place of butter throughout this recipe. We prefer butter because we love the flavor and how it really helps turn the chicken golden brown, but olive oil works just the same!

recommendation
Meat Thermometer
Buy Now

Stovetop Chicken Breast Tips
How long should you sear chicken breast? Depending on how thick your chicken breast is, it will take anywhere from 8 to 15 minutes. Just make sure the internal temperature of your chicken is at least 165ºF.
Is pan seared chicken healthy? Pan seared chicken breast is a healthy dinner idea because it’s high protein and low in carbohydrates.
How long do you cook chicken breast on stove top? Sear your chicken breast on high for 2-3 minutes on each side. Then, turn the heat down and continue cooking for about 6 more minutes, or until the chicken breast reaches an internal temperature of 165ºF.
Should you sear chicken before baking? If you are planning to sear and bake your chicken, we recommend searing your chicken first and then baking. You can sear your chicken for 2-3 minutes on each side and then finish cooking it in the oven.
Is chicken better in the oven or stovetop? Oven versus stovetop chicken is all about preference! If you’re cooking your chicken in the oven, it’s definitely less work, but the texture is much different. Oven-baked chicken will get you juicy, tender chicken, and stovetop chicken will get you juicy, tender chicken, but with a delicious browned crust.
Can you freeze cooked chicken? Freezing cooked chicken is super simple. All you have to do is let your chicken cool completely. Then, transfer it into a freezer-safe gallon-size bag. Remove as much air as possible and then seal. Freeze for up to 3 months.
Serving Suggestions
The great thing about this style of chicken breast is that it’s so versatile. Here are some serving ideas to really one up your meal!
- Add it to soup: use two forks to shred the chicken breast and then add it to soup. Try our Minestrone, Black Bean Soup, Simple Green Chili, Chicken Quinoa Soup.
- Tacos: Taco night is my favorite night of the week! Make a walking taco or follow our recipe for salsa chicken tacos and use your stovetop chicken as the shredded chicken!
- Serve it next to veggies: Keep things super basic and serve this pan seared chicken next to your favorite vegetables. We suggest our roasted red potatoes, crispy sweet potato fries, or roasted asparagus.
- Salad, Salad, Salads: Whether you want to make chicken salad, quinoa salad, or Mexican street corn salad, you can either shred or dice your chicken and add it to any salad!
- Slice it and add it to a bowl: Got leftovers? Add your pan fried chicken to any rice bowl! Try it in our: Mediterranean Buddha bowls, harvest grain bowls, taco bowls.

Storage
Store chicken in an airtight container in the refrigerator for 3-5 days.
To reheat: place chicken breast on a microwave-safe plate and microwave on high for 60-90 seconds.
Can you freeze cooked chicken?
Let chicken breast cool completely. Then, transfer cooked chicken breast into a freezer-safe gallon-size bag and remove as much air as possible. Seal and freeze for up to 3 months.
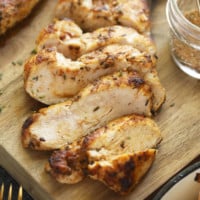
Juicy Pan Seared Chicken Breast Recipe
Make this flavorful stovetop chicken breast recipe and pair it with your favorite veggie and grain to complete your meal!
Prep: 10 minutesCook: 15 minutesTotal: 25 minutes
Ingredients
Chicken Seasoning
- 1 teaspoon garlic powder
- 1/2 teaspoon chili powder
- 1/2 teaspoon cumin
- 1/2 teaspoon dried thyme
- 1/2 teaspoon ground mustard
- 1/2 teaspoon dried basil
- 1/4 teaspoon ground pepper
- 1/4 teaspoon red pepper flakes
- 1/4 teaspoon sea salt
- 1/4 teaspoon paprika
- 1/2 teaspoon brown sugar
Pan-Seared Chicken
- 1.5 lbs. coneless skinless chicken breast (3–4 chicken breasts)
- 2–3 tablespoons butter (1 tablespoon/breast)
Instructions
- First, begin by preparing the chicken seasoning. Place all ingredients into a small bowl and mix to combine. Set aside.
- Next, prepare the chicken by using a meat tenderizer to pound the chicken until the thickness is even throughout. Then, season the chicken breast on both sides with the chicken seasoning.
- Heat 1/2 tablespoon of butter in a pan over medium/high heat. Once the butter melts, place chicken breast on the pan. Sear for 2-3 minutes or until golden brown. Flip the chicken breast, and optionally add another 1/2 tablespoon of butter to the pan and cover. Turn the heat down to medium and cook for around 6 minutes or until the chicken breast reaches an internal temperature of 165ºF.
- Let the chicken breast rest for 5-10 minutes before eating.
- Serve immediately.
Nutrition Facts
Serving Size: 1/4
Calories: 283
Sugar: 1
Fat: 8
Carbohydrates: 2
Fiber: 0
Protein: 49
Keywords: pan seared chicken breast, stovetop chicken breast
h3{flex:0 0 100%}.tasty-recipes-equipment .tasty-link-card{flex:0 0 50%;padding:1.5rem 1rem;text-align:center}@media screen and (min-width:500px){.tasty-recipes-equipment .tasty-link-card{flex:0 0 33%}}.tasty-recipes-equipment .tasty-link-card p{font-weight:700;font-size:1em;margin-bottom:0}.tasty-recipes-equipment .tasty-link-card p a{color:initial}.tasty-recipes-equipment .tasty-link-card span{font-size:.9em}.tasty-recipes-nutrition ul{list-style-type:none;margin:0;padding:0}.tasty-recipes-nutrition ul:after{display:block;content:” “;clear:both}.tasty-recipes-nutrition li{float:left;margin-right:1em}.tasty-recipes-plug{text-align:center;margin-bottom:1em;display:flex;flex-wrap:wrap;align-items:center;justify-content:center}.tasty-recipes-plug a{text-decoration:none;box-shadow:none}.tasty-recipes-plug a img{width:150px;height:auto;margin:5px 0 0 8px;display:inline-block}.tasty-recipes-footer-content{text-align:center;padding:1.5em}.tasty-recipes-footer-content .tasty-recipes-footer-copy{margin-left:0}.tasty-recipes-footer-content img,.tasty-recipes-footer-content svg{width:60px}.tasty-recipes-entry-content .tasty-recipes-entry-footer h3{font-size:1.25em;margin:0 0 .25em;padding:0}.tasty-recipes-entry-footer p{font-size:.75em;margin:0}.tasty-recipes-entry-footer p a{text-decoration:underline;box-shadow:none;border-bottom:none}.tasty-recipes-flash-message{display:inline-block;margin-left:10px;padding:4px 10px;background-color:#fff;box-shadow:0 .3px .4px 0 rgba(0,0,0,.024),0 .9px 1.5px 0 rgba(0,0,0,.05),0 3.5px 6px 0 rgba(0,0,0,.1);border-radius:4px;color:#313135;font-size:13px;letter-spacing:0;line-height:1.2em}@media screen and (min-width:500px){.tasty-recipes-flash-message{padding:4px 10px}}.tasty-recipes-flash-message p{padding:0;margin:0;text-transform:none}@media screen and (min-width:500px){.tasty-recipes-footer-content{display:flex;justify-content:center;align-items:center;padding:1.5em 0;text-align:left}.tasty-recipes-footer-content .tasty-recipes-footer-copy{margin-left:.8em}}@media print{.tasty-recipes-no-print,.tasty-recipes-no-print *{display:none!important}}
]]>
Source link

")


")

